Wondering how to use Squishy Circuits?
All the tips and tricks you need in one place to maximize the educational value of this wonderful product that fits perfectly with other engineering activities for kids and STEM activities.
In fact, making Squishy Circuits is one of our all-time favorite technology activities for kids!
Last Christmas, I got my kids a set of Squishy Circuits. We’d seen some light-up playdough projects and were excited to try our own!
But when we opened the box, it was just a bunch of lights, motors, and circuitry and we had no idea how to use it!

How to Use Squishy Circuits
I found the Squishy Circuits website, but some of the directions there are a bit vague and you have to already know a bit about circuits to understand what they are saying.
Get Squishy Circuits!

If you love science and STEM but don’t like hunting for supplies, we love the Mel Science kits. They have options for elementary and middle school, and each kit comes with all the supplies needed for each experiment!

What You Need to Make Squishy Circuits
Disclaimer: This post includes affiliate links for your convenience at no cost to you.
Inside each box of Squishy Circuits you’ll find:
- LED lights
- Battery
- Motor
- Buzzer
- Conductive dough
- Insulating dough
How to Use Squishy Circuits
*Some kits have more than this, some have less.
In our box, we had instructions for making the doughs, but not much other help.
Step 1: Finding the Right Dough
Squishy Circuits has instructions for making insulating dough and conductive dough on their kit boxes and on their website.
In doing more research, I found that you don’t have to make your own dough if you don’t want to. Play dough sold in stores is conductive, while modeling clay is insulating.
We typically combine the two to make our circuits, although you can also make your own dough.
I don’t really like the dough recipe on the Squishy Circuits website. That dough is stiff and hard to work with (or sticky).
Instead, I like to use this playdough recipe from Tinkerlab. It contains the necessary conductive ingredient (cream of tartar), but makes a smoother, softer dough that is easier to handle and feels so much better.
I’m guessing if you used de-ionized water and added some sugar to the recipe and skipped the cream of tartar, it would also make insulating dough, but I haven’t tried that one yet.
Step 2: Building a Circuit

The first time we made a circuit, I warned Monkey that if she touched the live LED wires to the live battery pack, she would get a shock.
The shock is pretty small, but sure enough, she did shock herself. She’s much more careful now, though!
Although Squishy Circuits are pretty kid-safe, the shock does smart a bit.
Never touch the bare wires to the battery when it is turned on, and don’t grab the battery wands when the battery pack is on. Just think about safety and you’ll be fine!
When you’re building your first circuit, your don’t even need insulating dough.
Basically, insulating dough acts as a barrier between the circuit to turn it off so that you can keep the two sides of the current from connecting.
If you attach both battery wands to the same piece of dough, nothing will happen.
You always have to connect the wands to two separate pieces of dough.
However, everything we made in this tutorial was made using conductive dough only. You can add in insulating dough later on!
Making a circuit is easy. The long end of the light (the positive side), must go into the same piece of dough that the red (positive) wand goes into.
The short end of the light goes into the same piece of dough as the black (negative) wand.
The easiest project you can do is make two balls out of the dough. Connect one side of a light to each ball and a wand to each ball.
Turn on the battery light, and ta da! You’ve made a circuit!
Step 3: Moving into More Complicated Circuits

Nothing we made in this tutorial was in any way complicated, but the next two projects did take a little bit of thinking. (yay, STEM thinking!).
Monkey wanted to know if she could get two loops to connect and light up. She added the lights, hooked up the wand, and it worked!
The key was to keep the two circles from touching. If they touched, the lights went out.
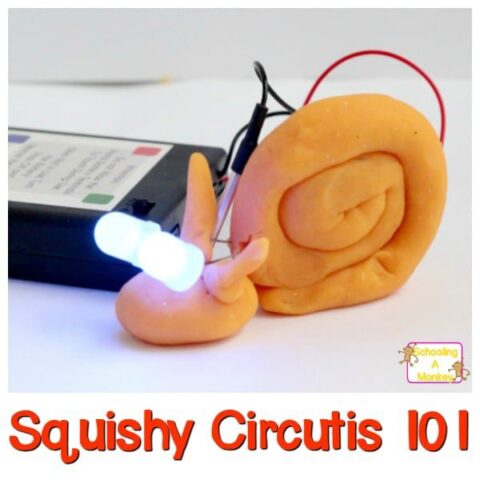
For our next project, we made a snail with light-up eyes. This little snail uses a bit of prospective trickery, as her head isn’t actually attached to her body at all.
One side of the lights are in the head, while the other side are in the body.
One wand connects to the body and one to the head. As long as the head doesn’t touch the body, the eyes will light right up!

Step 4: Completing Squishy Circuit STEM Challenges

We’re just now starting to understand our Squishy Circuits and everything they can do. There is a lot of learning you can do just with these basic projects!
But if you’re ready to move on to more complicated projects, try these fun ideas on how to use Squishy Circuits:
