When it comes to STEM activities for kids, we are always looking for fun hands-on ways to learn about math! In today’s project, we will learn how to design a coin from clay. For this activity to design a coin, we wanted to know why coins look like they do. Before starting our own design a coin project, we talked a bit about what is on money and why. This activity works particularly well as part of your St. Patrick’s Day STEAM activities!

How to design your own coins is a simple process, but there are several important elements to consider, even when offering students the STEAM activity on how to design a coin from clay.
Use the information and directions in this post to teach kids how to make your own coins and complete this fun STEAM activity in the classroom!
Table of Contents
DIY Clay Coins: How to Make Your Own Coins
Making a coin from clay can be a fantastic STEM (Science, Technology, Engineering, and Mathematics) activity that combines creativity with hands-on learning.
Here’s a step-by-step guide on how to design a coin!
Coin Facts for Kids
Before you start the design your own currency project, share these fun coin facts for kids with your students when completing your other STEAM for kids projects or math activities for kids!
Coins traditionally are decorated with the face of important political figures of that country (in the Untied States it is mainly presidents who adorn coins).
This is a simple way to indicate what country the money is from. All coins are also stamped with other country-specific images, such as slogans, flags, and important landmarks.

In the United States, the tradition of adding ridges to the outside edges of coins was implemented to prevent people from shaving the coins to collect the gold and silver they were made from originally.
When U.S. money was first invented, coins were worth their weight in gold or silver. We found most of our coin facts from The History Channel.
How Coins are Made for Kids
Watch this coin video for kids and then discuss the facts about coins for kids while making your own coin from clay and how to make a coin at home!
The most important thing to take away from the video is the history of money and then keep reading to learn how to design a coin.
Coins are made similarly around the world. Most countries use a process to make coins that include the following steps:
First, artists and designers come up with cool designs for the coins. These designs usually have important symbols or historical figures on them.
Once the design is finalized, it’s carved onto metal cylinders called dies. These dies will be used to stamp the design onto the coins.
Next, the metal that will become the coins is melted down and purified. It’s usually a mix of different metals like copper, nickel, or zinc, depending on the type of coin being made.
Now comes the fun part! A blank piece of metal called a planchet is placed between the two dies. Then, a powerful press smashes the dies together, stamping the design onto the planchet and shaping it into a coin.
After the coins are stamped, they’re inspected to make sure they look just right. Any imperfect coins are sorted out and melted down to be used again.
Finally, the finished coins are packaged up and sent out to banks, businesses, and collectors to be used or admired.

How are designs made on coins?
Designing coins is a creative process that involves a few important steps. Here’s how it works:
First, artists and designers think of different themes and symbols that could go on the coin. These might include historical figures, important events, or symbols that represent a country or organization.
Once they have some ideas, designers start sketching out rough drafts of what the coin could look like. They might draw several versions until they find one they like.
After choosing the best sketch, designers refine the details and make sure everything looks just right. They might use computer software or traditional drawing tools to perfect the design.
Once the design is finished, it goes through a review process. This might involve getting feedback from experts or officials to make sure the design meets certain criteria and accurately represents the intended theme.
The approved design is engraved onto metal cylinders called dies. These dies will be used in the minting process to transfer the design onto the blank coins.
By following these steps, artists and designers can create beautiful and meaningful designs that end up on coins for people to use and admire.
Who invented ridges on coins?
The invention of ridges, also known as reeding, on the edges of coins is attributed to Isaac Newton, the renowned English mathematician, physicist, and astronomer, who is widely recognized for his contributions to science.
In 1696, Newton was appointed as the Warden of the Royal Mint in London, where he played a significant role in reforming England’s currency system. One of the innovations he introduced was the addition of ridges or reeding to the edges of coins.
STEM Shirts for Teachers
These STEM shirts are adorable and super fun to wear while teaching STEM or science.


The purpose of these ridges was to prevent people from clipping or filing small amounts of precious metal from the edges of the coins without noticeably reducing their weight.
This helped to deter counterfeiting and preserve the value of the currency. The idea was revolutionary and was soon adopted by other mints around the world as a standard feature on coins.
How do I design a coin?
Designing a coin can be a fun and creative process! Here you can learn what is the first process in designing a coin and how to create a design for your own coins!
- Start by thinking about what you want your coin to represent. It could be a personal symbol, a commemoration of an event or achievement, or even something whimsical. Look at existing coins for inspiration and think about what elements you want to include in your design.
- Grab a pencil and paper and start sketching out your ideas. Don’t worry about making everything perfect at this stage—just focus on getting your ideas down on paper. Experiment with different layouts, symbols, and text until you find a design you like.
- Once you have some rough sketches, choose one or two to refine further. Add more detail, clean up the lines, and make any necessary adjustments to ensure your design looks balanced and visually appealing.
- Take a step back and look at your design critically. Make sure it effectively communicates the message or theme you want to convey. Consider getting feedback from friends, family, or online communities to get different perspectives on your design.
- Once you’re happy with your design, etch or stamp it into your clay coins for this STEAM money activity for kids!
STEM Teaching Resources
These teaching resources will make your STEM classroom more fun and rewarding for your students!


Remember, designing a coin is a creative process, so don’t be afraid to experiment and have fun with it! And who knows, maybe one day your design will end up on a real coin for everyone to see.
More Money Activities for Kids
If you need more money activity ideas, try these!
Fun Learning with Play Store Math
Soup Can Printable PEMDAS Worksheet for Teaching Order of Operations
The Mason Jar Scientist: 30 Jarring STEAM-Based Projects Creative Kids Flakes – 600 Piece Interlocking Plastic Disc Set for Fun, Creative Building – Educational STEM Construction Toy for Boys & Girls – Non Toxic, Ages 3+Straw Constructor STEM Building Toys 300 pcs-Colorful Interlocking Plastic Enginnering Toys- Fun- Educational- Safe for Kids- Develops Motor Skills-Construction Blocks- Best Gift for Boys and Girls …CoolToys Monkey Balance Cool Math Game for Girls & Boys | Fun, Educational Children’s Gift & Kids Toy STEM Learning Ages 3+ (65-Piece Set)Learning Resources Code & Go Robot Mouse, Coding STEM Toy, 31 Piece Coding Set, Ages 4+DK Workbooks: Science, Kindergarten: Learn and ExploreTinkerActive Workbooks: Kindergarten ScienceScientific Explorer My First Mind Blowing Science Kids Science Experiment KitLearn & Climb Science Kit for Kids – 21 Experiments Science Set, Hours of Fun.UNGLINGA Kids Science Experiment Kit with Lab Coat Scientist Costume Dress Up and Role Play Toys Gift for Boys Girls Kids Age 5 – 11 Christmas Birthday PartyLearn & Climb Kids Science Kit – Over 60 Experiments, Fun with Science!4M 5557 Crystal Growing Science Experimental Kit – Easy DIY STEM Toys Lab Experiment Specimens, A Great Educational Gift for Kids & Teens, Boys & GirlsDiscovery Extreme Chemistry Stem Science Kit by Horizon Group Usa, 40 Fun Experiments, Make Your Own Crystals, DIY Glowing Slime, Fizzy Eruptions, Gooey Worms & MoreCrayola Color Chemistry Set For Kids, Gift for Age 7+


How Do You Make a Coin? The First Phase of How to Design a Coin
What is the first process in designing a coin? Before you can make a coin, you need the right supplies.
We made our coins out of oven-baked clay, but you can use other types of clay as well. Make sure you have the correct supplies before trying this activity with your students or kids at home.
This post contains affiliate links for your convenience.
- Oven-bake clay
- Buttons and other textured items
- Rubber texture stamps
- Clay sculpting tools
With these simple tools you’ll be able to complete the design your own money activity.

Design Your Own Currency Project Directions
Follow along the printable directions below for how to design your own currency and how to design a coin to complete your coin making STEAM activity!
Design Your Own Currency Project
Instructions
Step 1
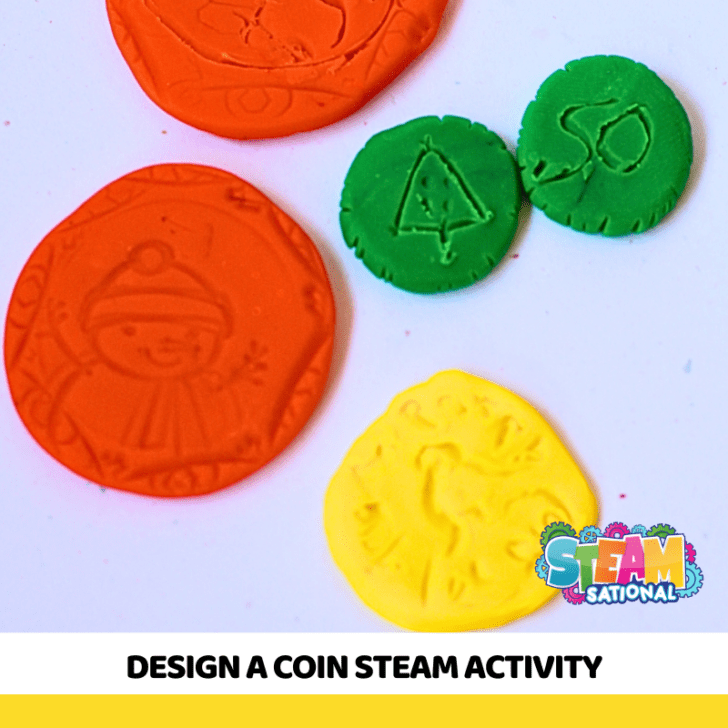
Decide on a monetary value: We discussed what we wanted our currencies to be and the size and color each coin should be. Monkey decided we needed a coin worth 100 cents, five dollars, and 50 cents.
The orange coins are worth $5, the ellow coin was worth 100 cents, and the small green coins were worth 50 cents. Monkey thought that in today's world, smaller denominations were not important.
Step 2
Make the coins: Roll your clay into a ball and smash it with your thumb to make a coin shape about 1/4 of an inch thick.
As we designed our coins, we talked about what we wanted on them design-wise. We talked about why coins look like they do and the important features that should be on a coin.
We discussed how it is important to add texture, theft-prevention, and imagery from our imaginary country on the coin. Our president was a snow person.
Step 3
Bake: Bake your clay according to your package directions. We had to bake ours for 15 minutes at 275 degrees. Allow the money to cool before playing with it.
Step 4
Play: After your coins are ready, use them in all sorts of math-related fun! We used ours in a play store (click here to get the free play store math printable that we used) and to learn about money in a fun hands-on way during math lessons.
STEM Classroom Decorations and Bulletin Boards
Here are some fun STEM themed classroom decorations and bulletin boards that will make any classroom more fun!


Science Has All the Solutions Decorating Kit

What is a Scientist Decorating Kit

Science is All Around Us Decorating Kit

Scientific Method Classroom Posters


Science sayings bulletin board decor

Forces of motion bulletin board set


