Our favorite activities are STEM activities and science experiments for kids. My kids love doing hands on science experiments and hands on STEM activities.
Science is their favorite subject in school! This summer, we love doing ice science experiments, and today, we experimented with an oil and ice experiment.
We really didn’t know what would happen to the icy oil and water before we started this science experiment, which made it a true science experiment!

My kids loved how the oil and ice reacted and mixed to make different colors.
When doing this experiment, the kids learned all about density, color mixing, and states of matter.
If you want to do this experiment as well, read on to find out how we did our oil and water science experiment!
You’ll also want to check out the ultimate list of summer STEM activities and the ultimate list of summer science experiments.
Ice and Oil Experiment

Today, science experiments for kids are more important than ever. Science and technology are huge parts of our world today, and the future will be even more science and tech-focused.
Kids who aren’t immersed in the world of science and STEM exploration from a young age will be left behind their peers, and may struggle to find work in the fast-changing landscape of future careers.
Science experiments are usually basic, but they can help spark a love of science and discovery in a child that will follow them throughout their life.
The simple science experiment that a child does today may spark their desire to discover something that will change the world in the future.
Every day, young children are using science experiments to solve real-world problems in medicine and technology that have never been uncovered before.
And all these scientific discoveries start with a firm foundation in science and STEM.
Don’t Miss: 31 Creative STEM Activities for Kids
The Scientific Method for Kids
Every science experiment contains four elements:
A Question
Kids should start every science experiment with a question, even if that question is just “what will happen?”
A Hypothesis
Before doing any experiment, children should record what they believe will happen.
An Experiment
This is where the fun part comes into play. Test the hypothesis to determine if it answers the question fully.
A Recording and Analysis
As the test is completed, record what happened and analyze why.
A Re-test
Try different variables and try a new test to see if the original answer is confirmed or disproved.
You may also like: Quick STEM Activities for Kids
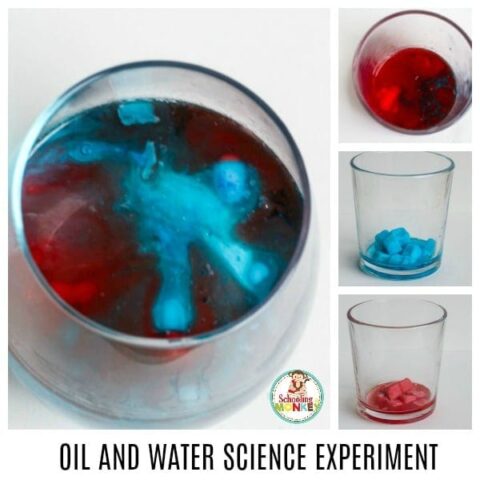
Oil and Water Experiment Hypothesis

When doing this experiment, the kids learned a lot!
When we froze the oil, we learned that oil doesn’t always freeze completely.
We used olive oil to make our cubes, which has a higher fat content, making it more likely to solidify in the freezer.
When we placed the oil cubes in water, the kids learned about liquid density, as the oil rose right to the top of the glass.
Then, once the oil cubes melted, the colors combined, forming a new color!
The kids learned that oil and water won’t mix, because oil is hydrophobic.
And during the freezing process, we talked about the three states of matter, liquid, solid, and gas.
Get the STEM Challenges for Kids!
Expand on your science experiments with the free printable science experiment challenges.
It’s the perfect way to help children go through the scientific process with every science experiment they try.

Mixing Oil and Water Science Experiment Supplies
This post contains affiliate links. View our privacy policy for more details.
The Mason Jar Scientist: 30 Jarring STEAM-Based ProjectsCrisco, Pure Vegetable Oil, 48 oz
Wilton Primary Candy Color Set
12 Ball Mason Jar with Lid – Regular Mouth – 16 oz by Jarden
Arrow 60 Cube Ice Tray (3 Pack)


Set Up an Oil and Water Science Fair Project
Follow along to learn how to make your own oil and water science investigation.
This is an open-ended science experiment where you draw your own conclusions.
It’s the perfect open-ended science experiment for preschool through second grade.
For more fun science experiments, try the hot and cold water density experiment, make a non-Newtonian fluid, make fluffy slime, or learn how to make butter!
Ice and Oil Experiment Directions

You will need oil-based food coloring for this activity, which I’ve only been able to find online.
Candy food coloring might work, or you might need to use candle dye.
Dye your oil at least two colors, or you can dye it all three primary colors red, blue, and yellow for the full spectrum of coloring.
Pour the oil into the ice tray and freeze. The higher quality your oil, the more likely it is to freeze up.
Thinner oils will turn to mush, but higher quality oils should form firm cubes.
You will have to experiment with this part to see what works best for you.
Once the oil has frozen, remove it from the tray.

The oil will start to melt quickly, so you’ll have to do the next part fast.
Place one or two colors of oil cubes into a jar and then pour water over it.
Watch as the oil rises to the top and as it melts, combines colors to make a new color.

Ask the kids why they think the oil rises to the top, and how they could get oil to turn from a liquid to a gaseous state. How would this work with water?